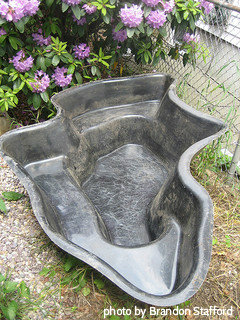
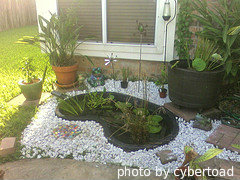
Installing a Preformed/Rigid Backyard Pond Liner
A preformed rigid liner is typically overall compared to the flexible liner a little tougher for installing. But it is still a relatively simple procedure. One of the main points that should always be considered in any style of liner and when you are digging your pond area is to make sure that the liner is always level all the time. This is one of the most and important installation tips that you could use. If this is not followed you will typically have a less quality installation of the liner.
Try to install near a Water Source/Electrical Supply
Once you have gone through and found the pond design that you want it is recommended that you take it and move it to a variety of areas in your yard where you would like to install this. Make sure not to install it over any kind of sewer, electrical, gas lines and try to provide access to a water source and electrical source for a pump or pond lighting.
Your first step is to take the liner and put it where you have decided to build your pond and position it over top of the area that you would like before you dig. You may have to place something underneath the portions that have varying depths of your liner to give it a support while it sits there.
If you have a smaller size of pool area that you are marking you just have to flip it over onto the ground where you will be able to mark out the top edge which will provide you the full outline of your pond area.
Installing a Rigid/Preformed Pond Liner Step-By-Step
- Marking out the Pond Liner: You should next take a handful of stakes and outline the edges of your pond so that you have a good positioning of the edge of your pond area. Remove the pond shell and use a rope or a garden hose to outline the pool area that you want to dig out. You could also use flour or a spray paint landscaping marker to give you a good template of the shape of the pond.
- Digging out the Pond Shape: It is recommended that when you are digging out the area for your pond that your overall hole needs to be larger than the actual pond that you are trying to install. You should allow for an extra 2 inches around the outside edge of the pond where it is going to sit. It is also recommended that you dig an extra 2 to 3 inches deeper than how the actual liner will sit (depth of the overall liner size). Now you want to copy the exact shape of your liner including any shelves that are incorporated into the mold. Adding these extra shelves will also help with the structure support of the pond. Frequently take your 2 x 4 on either side of the pond and on the inside shelving and checking the level of the edges with a proper leveling tool. This is very important as you want the pond to be level as not to have water leaning to one side. In the process of doing this and to help you monitor your progress when needed put the liner back into the hole to see how things are coming along. Make sure you are measuring the depth properly and widths from the preformed liner.
- When the Hole Is Dug out: Once you have dug out the shape of your hole and checked that your liner sits perfectly inside as recommended, make sure that there is no sharp objects and especially loose stones that may be left on the edges or on the bottom of the pool area. On the bottom of the dugout pond spread a good layer of moist sand or a good grade of fine sifted soil, making sure there is no debris in the dirt. This will provide you the overall cushion that you need to help protect the liner from any damage. You can use a long piece of wood to help you level out the sand on the bottom. Use a long level to give you a good overall impression that the bottom of the pond is also level from one side to the other. Now you need to pack down the sand/dirt to make sure that it is firm and solid (re-check for leveling). If you find any low spots fill them in with a little bit of sand and pack again and recheck level.
- Check Liner Fit: This can be your final fit inspection and again checking your overall level. You may have to do this a few times by taking the liner in and out of the hole until everything sits down level and flush all the way around your liner.
- Installing Liner/Check and Level: when everything is level and sitting firmly inside with a good base at the bottom you want to add at least 4 to 6 inches of water into the liner itself giving you a little bit of support and to put little pressure on the bottom of the pool. You then want to backfill around the edges of the pool to start to give it some support(mixture of dirt and sand) by using a shovel or a 2 x 4 you can add the mixture and start tapping it down to make it a more solid fit on the inside sides. Fill with more water and repeat the filling and packing process on the edges of the pool until you have completely filled up the pond.
- Finishing with Decorative Edging: Taking the edge of the liner and some fine crushed filler stone that you can get from your local hardware/landscaping store and position it underneath the lip and around the liner edges to give it support. You can then position your flagstone, designer rocks on top of the edge in order to finish off the outside edge of your pond area. Once you have completed this decorative edge you will have finished off your pond installation and will be ready to add your pump and fountain feature or start to put in your plants.
Building your backyard pond process:
- Building a backyard pond
- Digging out your pond
- Installing a flexible pond liner
- Selecting a Pump for Your Water Garden
- Backyard pond maintenance tips
Preformed Liners Are a Ready to Install Pond Kit
 As you can see the rigid/preformed liner can be a little bit tougher to navigate inside of your pond area. You are also limited to the shape and depth of how they come. A good feature of it is it gives you a complete idea and structure to work with. You can choose a small to a larger pond without any kind of different installation application.
With today's technologies you will find reinforced plastic liners that manufacturers will guarantee for up to 10 to 20 years. The fiberglass/plastic liners are very strong against freezing or any ultraviolet degeneration from the sun. Being relatively easy to install, these are very beneficial to also line small raised pools.
Outdoor garden furniture to complement your backyard decor
There is no better way to enjoy the great outdoors but with outdoor garden furniture and outdoor lawn furniture. Being able to sit outside and read a book, talk to friends, or simply just enjoy the feeling of the sun on your face, is one of the things that makes outdoor garden furniture so popular.
Complement your water feature with musical wind chimes
Imagine the tranquility of Musical Wind Chimes and the experience of listening to delicate sounding wind chimes.Wind chimes are made from either wood or metal. In ancient cultures, musical wind chimes were made from bamboo.


